Getting Started With Spring Boot … Part 1
Spring is an application framework that provides complete infrastructure for the development of Java applications. It’s packed with nice features such as Spring MVC, Spring JDBC, Spring Security, Spring ORM etc.
These modules reduce significant time in the development of applications. For example, In early days of Java web development, We need to write a lot of boiler plate code to insert data into database. But with Spring JDBC it is reduced to very few lines in terms of configurations.
The most important feature of Spring is Dependency Injection. At the core of all Spring modules is Dependency Injection or Inversion of Control(IOC). With DI and IOC we can develop loosely coupled applications. And the loosely coupled applications can be easily unit tested.
One significant overhead with spring is that the amount of configuration that has to be done while developing applications
Spring Boot solves this problem with the combination of Auto Configuration and Starter Projects.
Spring Boot:
Spring boot is an open-source Java Framework used to build production grade Spring Applications. By definition, it is an application framework and inversion of control container for Java Platform. We’ll discuss about inversion of control in our upcoming posts.
Essentially Spring Boot is a project built on top of Spring framework i.e an extension of Spring framework which eliminated the configurations required to setup an Spring application.

Enough with the introductions and definitions, Let’s kick start the development of Spring Boot application with a sample app
We can easily create and run a spring boot app in 15 minutes. All we have to do is visit Spring Initializr and create a spring boot project with the dependencies of our choice.
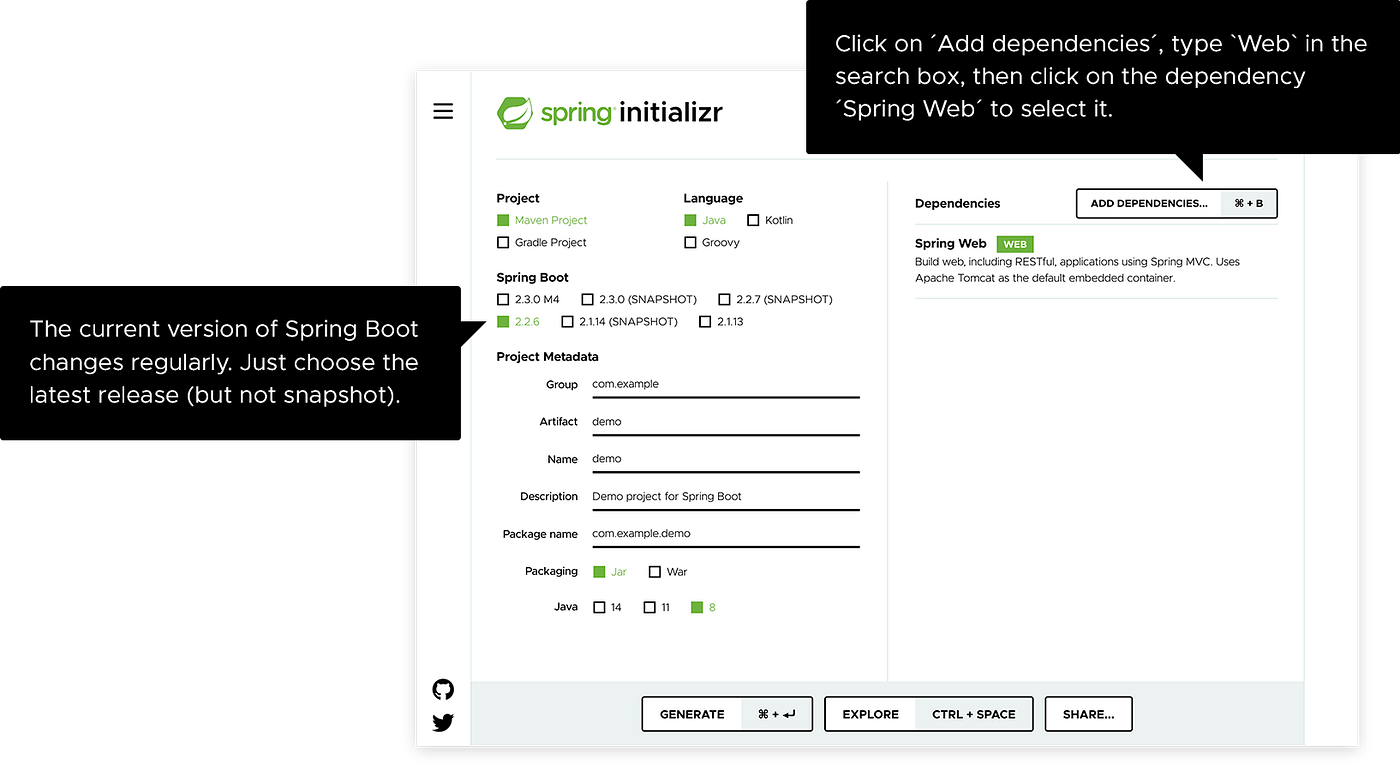
We will use two dependencies, Spring Web and Spring dev tools ( tools highly useful for spring development)
Click Generate, download the zip and unpack it into a folder in your computer.
We can run the spring boot app directly without any IDE by navigating to the folder and using the command
./mvnw spring-boot:runin Mac or
mvnw spring-boot:runin windows.
In this post, we will see importing your project into eclipse and running the spring boot app via eclipse
Open Eclipse App and go to Help → MarketPlace Search for Spring Tools . Install the Spring tools plugin and restart the eclipse.

Now go to File → Import → Maven ( Existing Maven Projects) → Browse the folder location → finish
Now you can see the folders & files present in the project in Project Explorer
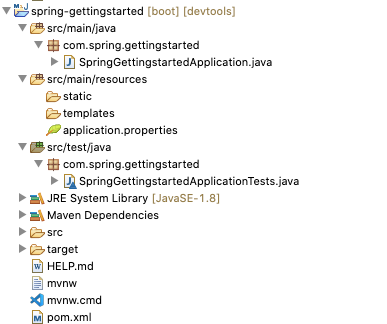
we can see two classes generated automatically SpringGettingStartedApplicaiton.java & SpringGettingStartedApplicationTests.java — Spring boot by default generates test folder and encourage us to write unit test for our code.
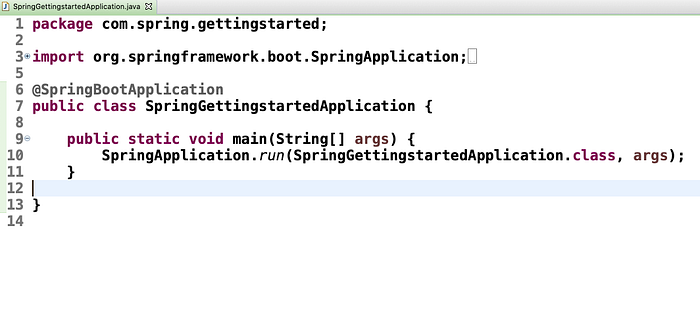
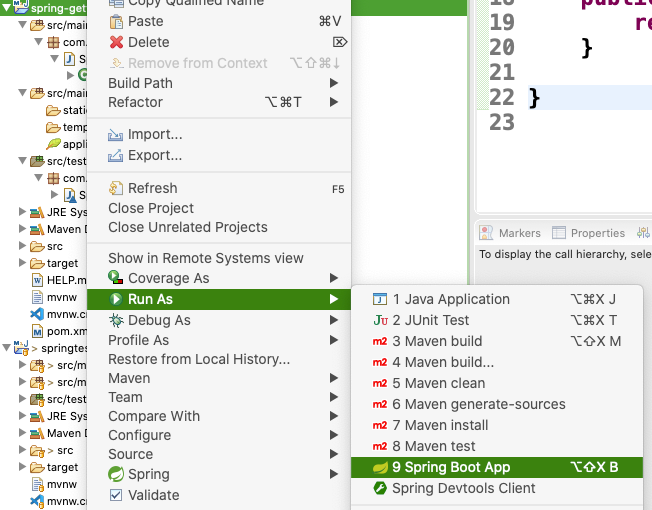
Now click on the SpringGettingStartedApplication.java file we can see a main function. We are going to write a sample get API and run it as an spring boot app via eclipse
Detour @SpringBootApplication annotation:
SpringBootApplication — its an annotation unique and newly created in spring boot that comprises of three annotation provided in spring @EnableAutoConfiguration, @ComponentScan, and @Configuration.
Enable Auto Configuration annotation specifies the spring boot to look through the dependencies and configuring them automatically reducing lot of work for developers ( for example configuring data source if hibernate jar is present). It is implemented in spring-boot-autoconfigure.jar ( ref : https://www.springboottutorial.com/spring-boot-auto-configuration )
Component Scan annotation specifies the application where to look for beans(components) i.e Once you define a Component Scan for a package, Spring would search the package and all its sub packages for components/beans.
(note : If all the packages you develop in your application is sub packages of the main package @SpringBootApplication is enough. Or else you have to explicitly mention component scan annotation)
Configuration annotation on top of any class to declare that this class provides one or more @Bean methods and may be processed by the Spring container to generate bean definitions and service requests for those beans at runtime.
Write the following code into the Spring getting started application class

@RestController → In Spring’s approach to building RESTful web services HTTP requests are handled by a Controller . The components are identified by @RestController which is a combination of @Controller(which marks a class as controller servlet) and @ResponseBody( the response will be sent as body )which are introduced in the previous version of Spring.
Target(value=TYPE)
 @Retention(value=RUNTIME)
 @Documented
 @Controller
 @ResponseBody
public @interface RestController
RestController Implementation
@GetMapping → annotation maps HTTP GET requests onto specific handler methods. @GetMapping is a composed annotation that acts as a shortcut for @RequestMapping(method = RequestMethod.GET).
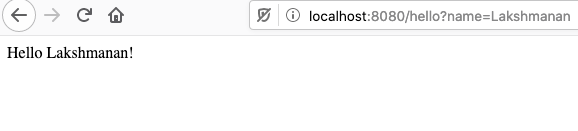
We are additionally defining a query parameter name with world as a default value. Now, Run the project as SpringbootApp in eclipse as follows
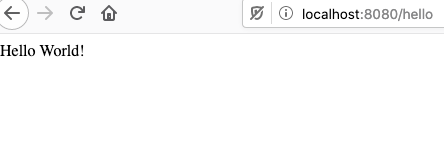
Once the server starts open the browser of your choice and hit the url http://localhost:8080/hello
If you pass the optional parameter name as a query parameter then you will get the following response.
We will continue to explore more technologies. Be sure to follow to get regular updates on my posts.